Fell i love with OpenWrt so I continued on and purchased a Zyxel GS1900-8HP which boasts 802.3af/802.3at (PoE/PoE+) and 802.1Q VLANs after a little research there seems to be a new PoE+ HAT for the Raspberry Pi 4, so I’ll still have to get my hands on one of those and an AP, but the old Asus RT-AC68U in AP Mode will have to suffice for now.
Notes
I’ll do some repeat of the previous article OpenWrt on Raspberry Pi 4 so that I have some notes here in-case I need them in the future.
DISCLAIMER: This is not an in-depth guide, you should have overall Linux, network and storage knowledge/experience, proceed on your own risk!
Configure the Zyxel GS1900-8HP
You will need to set the IP address of your computer to something like 192.168.1.10 with netmask of 255.255.255.0
Plug the switch into a computer and browser to http://192.168.1.1, set the password then head over to
Configuration -> System -> IP
And configure the following
Mode: Static
IP Address: 192.168.1.2
Subnet Mask: 255.255.255.0
Gateway: 192.168.1.1
Management VLAN: 1
Now the switch has a different IP than the upcoming Raspberry Pi 4 will have.
I’ll keep VLAN1 as the management VLAN, head over to
Configuration -> VLAN -> VLAN
and add the required VLANs for this configuration so that it looks like something like this:
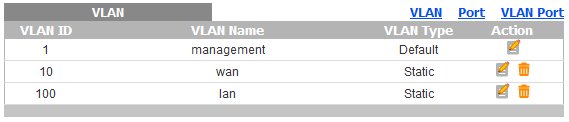
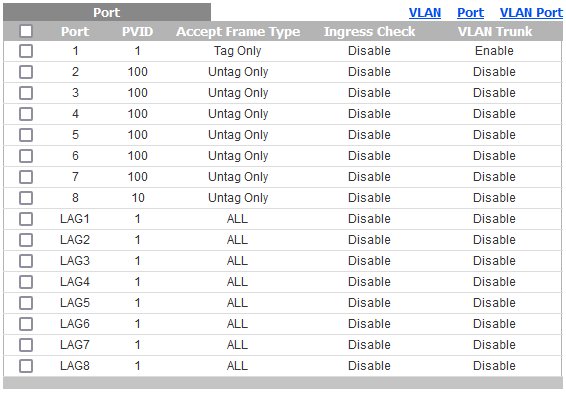
As the image shows, VLAN1 will be used for management, VLAN10 for WAN and VLAN100 for LAN, I’ll be connecting the Raspberry Pi 4 to port 1, WAN on port 8 and the rest till be untagged VLAN100 LAN, which the AP can be connected to any of the ports 2-7, I’ll be using port 7. Click the ‘Port’-link up towards the right in the image and configure this page to look something like this (note that Port 1 is VLAN Trunk Enabled):
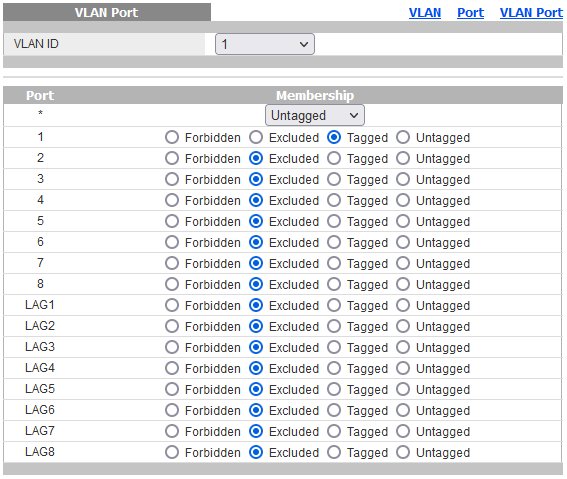
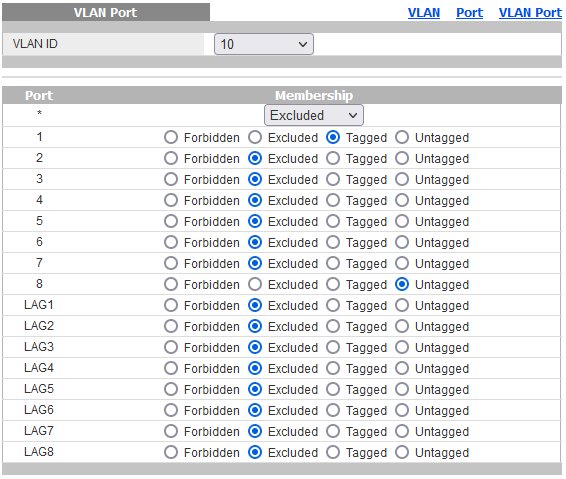
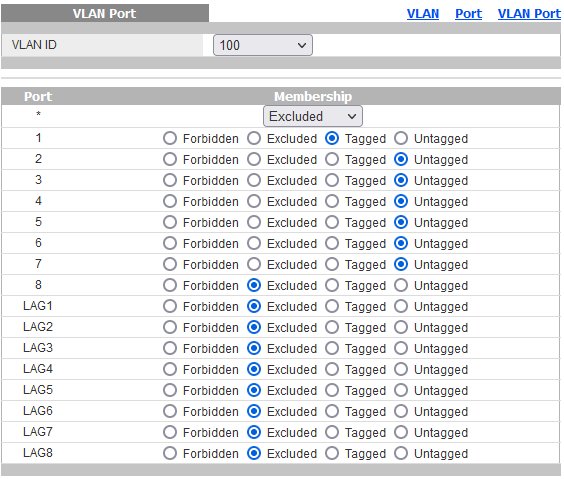
Lastly head over to the ‘VLAN Port’-link towards the upper right in the image and configure the ports to look something like this
VLAN ID 1
VLAN ID 10
VLAN ID 100
Now the network segmentation is configured, let’s move on to the Pi.
Configure Raspberry Pi 4
Download the file from OpenWrt for the Raspberry Pi 4: “rpi-4-ext4-factory.img.gz”
Flash the file with Etcher to your SDCard, I noticed that the root partition doesn’t use the entire SDCard capacity so let’s increase it:
replace the device path and partition path with your values in case it’s not the same
# resize the rootfs wich is in this case partition 2
sudo parted /dev/mmcblk0 resizepart 2 100%

# fix the consistency of the filesystem
sudo e2fsck -f /dev/mmcblk0p2 -y

# then resize it to the partion size
sudo resize2fs /dev/mmcblk0p2

# and then check/fix the consistency of the filesystem again
sudo e2fsck -f /dev/mmcblk0p2 -y
Connect the Asus RT-AC68U to your computer via the yellow port 1 and configure the router to operate in AP Mode with manually configured IP:
IP: 192.168.1.3
Netmask: 255.255.255.0
Gateway: 192.168.1.1
DNS: 192.168.1.1
Disconnect Asus RT-AC68U from the computer and eject the SDCard prepared previously and insert it into the Raspberry Pi 4, then connect it to a computer to configure it.
# ssh to the Raspberry Pi 4
ssh root@192.168.1.1

# set a password for the root account
passwd

# make opkg lists permanent
sed -i 's,/var/opkg-lists,/usr/lib/opkg/lists,' /etc/opkg.conf

# remove the Raspberry Pi 4 wifi config
>/etc/config/wireless

# disable internal wifi
echo 'dtoverlay=disable-wifi' >> /boot/distroconfig.txt

# redirect LuCI HTTP -> HTTPS
uci set uhttpd.main.redirect_https=1
uci commit uhttpd

# set SSH listening interface to 'lan'
uci set dropbear.@dropbear[0].Interface="lan"
uci commit dropbear
You should now be able to access the LuCI Web Interface, login through http://192.168.1.1 (use the password set before with passwd)
Head over to
Network -> Interfaces -> Add new interface…
Name: wan
Protocol: DHCP Client # configure according to your ISP
Device: --custom--: "eth0.10"
Click Create interface then select the Firewall Settings tab on the following page and click Create / Assign firewall-zone and add WAN zone if not already added, then hit Save.
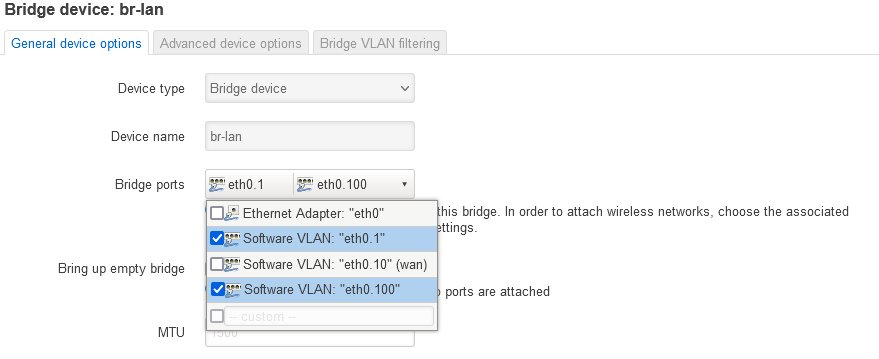
Then click the Devices tab, click Configure on br-lan and in Bridge ports check the –custom– and add eth0.1 and another eth0.100 and you can remove the eth0 so that it looks like this
Hit Save & Apply, disconnect the Pi and connect everything like so: Pi -> port 1 on switch WAN -> Port
| Device | Switch |
|---|---|
| Pi | Port 1 |
| AP | Port 7 |
| WAN | Port 8 |
Note: Port 7 to Blue port on the Router in AP mode
On your computer remove the IP configured from before so that you’ll get and assigned IP from the Pi once it’s up and running.
First start the switch, then the Pi and check that internet works and lastly the AP and check that the WiFi is functioning.
You should now have a working Raspberry Pi 4 running in a router-on-a-stick configuration.
And don’t forget to keep your OpenWrt up to date as you would do with regular routers.
Keep your packages up to date with:
# fetch a row with upgradable packages
opkg update && opkg list-upgradable | awk '{printf "%s ", $1}'

# upgrade them (omit those you do not want to upgrade for some reason)
opkg upgrade <row from previous output>